Key Connections
Visual Arts
- Portraits contain clues about the people pictured in them that can tell us things about the subjects’ cultures, identities, traditions, and roles in society.
- Portraits can express how people think about themselves and their world.
- Portraits can include symbols that reference interesting aspects of the people in them.
- When creating a portrait, an artist makes many artistic choices that affect how we understand the image.
- Artists make choices about media, style, background, and embellishments to visually describe themselves or others.
Writing
- Written texts contain clues about the people described in them that can tell us things about the subjects’ cultures, identities, traditions, and roles in society.
- Biography and autobiography are written works that describe interesting aspects of the people in them.
- Writers make choices about writing style and format to describe themselves or others in writing.
Instructional Objectives
Visual Arts
- Students will identify parts of a portrait and use art terms to describe them.
- Students will explore ways artists express identity in portraits.
- Students will interpret a portrait through observation and discussion.
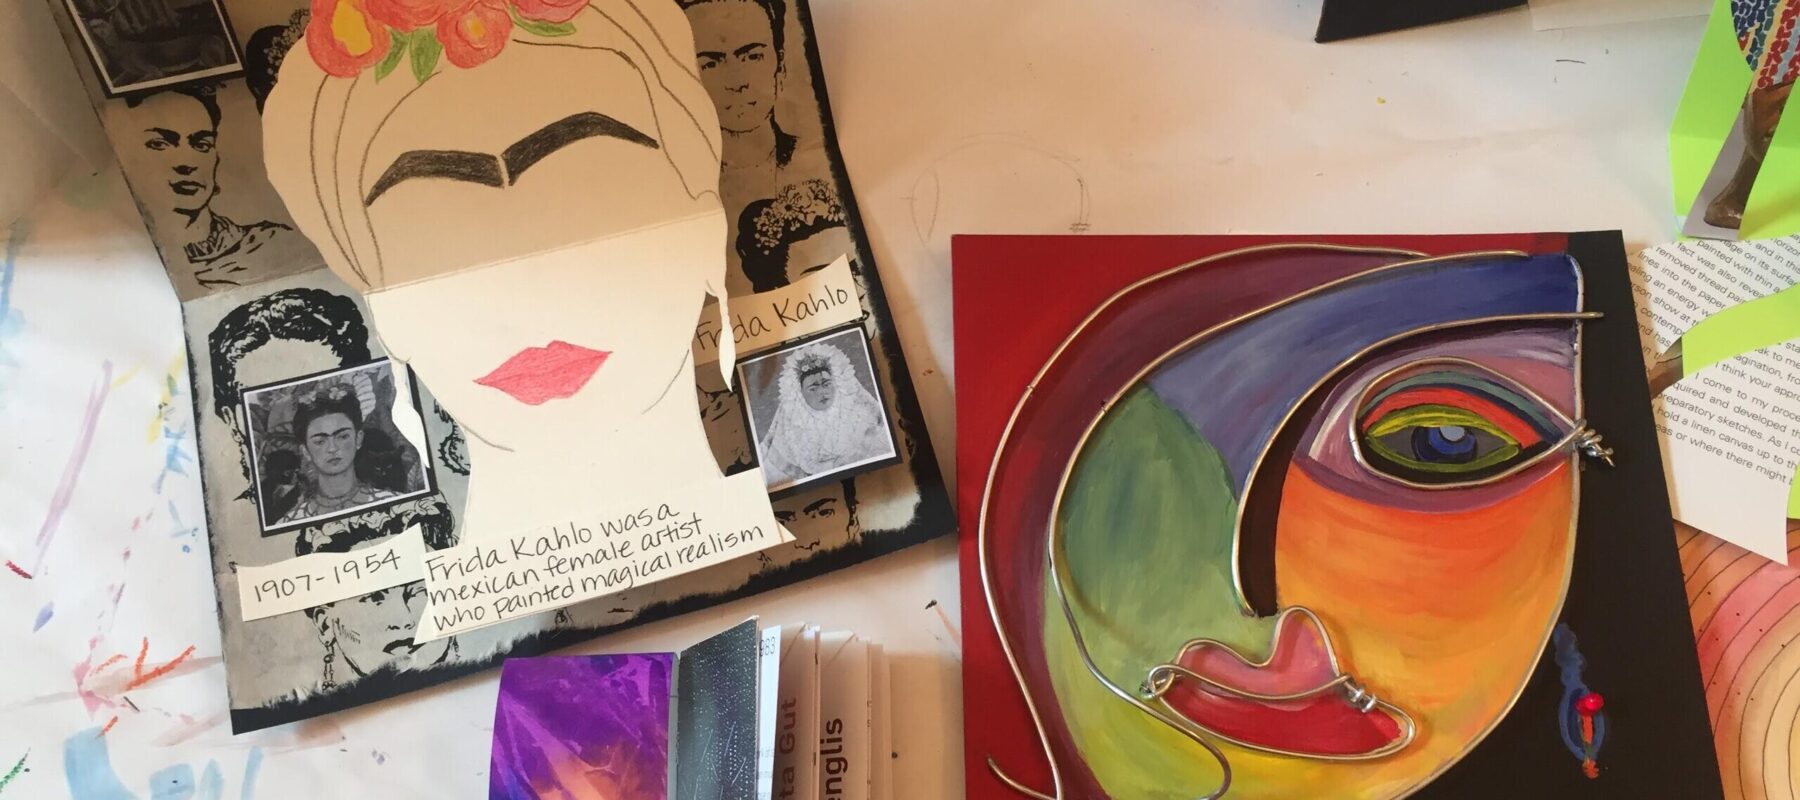
- Students will create a self-portrait in the form of a book.
- Students will use symbols to express their roles in society, traditions, and aspects of themselves or other people.
- Students will understand the meaning of a symbol.
Instructional Plan
Observe
Ask the class to come up with a definition of portrait. Almost everyone has experienced portraiture, either by being in a portrait or making one of someone else, usually a photograph. Ask students to recall different occasions they have been in portraits (school photos, sports photos, and family occasions). Ask what they expect to see in a portrait. What makes a good portrait? What should a portrait tell us about the subject? Should it make the person look better than they do in real life? Why or why not? By thinking about how an artist created a portrait (how they used color, line, shape, form, space, value, and texture to express ideas, moods, and feelings) we can gain insight into what the artist wanted to express and even how the artist may have felt about the subject. Today, artists often create portraits to explore personality, express identity, and speak about social and political issues.
A Closer Look
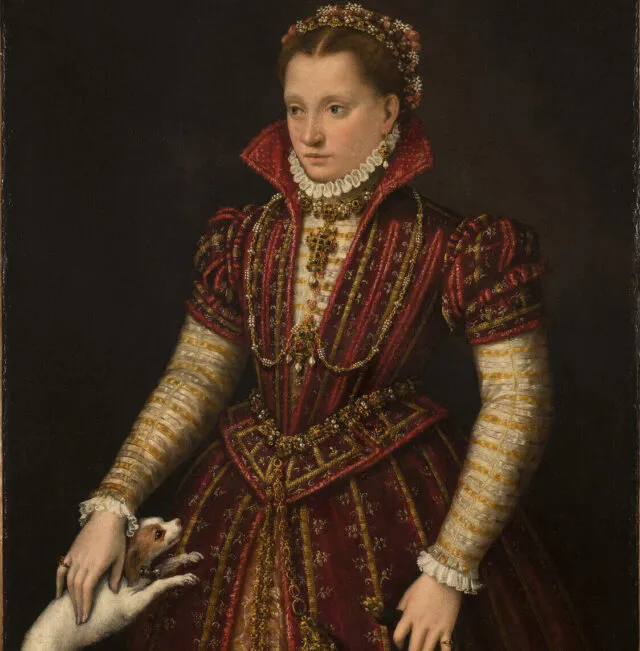
Ask students to look closely at Fontana’s Marriage Portrait of a Bolognese Noblewoman (Livia de’ Medici Bandini?) and begin describing and interpreting what they see. Visual Thinking Strategies is a highly effective method for facilitating productive conversations about art with your students and introducing new vocabulary in a meaningful way. Following the conclusion of this initial exploration of the work, you may wish to revisit certain concepts in more depth using some of the questions in the Discussion section.
For additional artworks to include with this lesson, please view this art gallery. To learn more about the featured artist, check out Lavinia Fontana’s artist profile.

Discuss
- Who is the subject?
- What is the subject wearing? What can you tell about her from her clothes?
- Describe her facial expression. Is she looking out at us? What might the expression say about her mood?
- Describe her pose. How much of her body is shown? Is she making any gestures
- How old do you think she is? What do you see that makes you think that?
- What other objects do you see? Could they be symbols? If so, what do they represent?
- What, if anything, is in the background? Why do you think the artist chose a plain background?
- What do you think the artist wanted you to know about the woman’s identity? What do you see in the painting that makes you think this?
For additional discussion questions, download the full lesson plan.
Create: Self-Portrait Book
In advance of this project, you may wish to view this Self-portrait Book instructional video, which provides a step-by-step demonstration of how to create a self-portrait book.
Supplies
- 8 1/2 -by-11-inch colored copy paper, one sheet per student
- Pencils, colored pencils, crayons, markers
- Student journals
Activity
Make the Book
- Begin by placing the piece of paper horizontally on the desk in front of you. (One of the paper’s long sides will be closest to you.)
- Fold the paper in half loosely by bringing the two short sides together, but do not press down to crease the paper. Instead, pinch the top of your paper at point where the fold would be in order to mark the middle of the paper. Then open the paper back to its original position.
- Fold the left side of your paper toward the middle, lining it up with the slight mark you made in step one and press firmly to crease the paper. Leave the flap closed. Then, do the same with the left side of the paper. Your paper should now have a set of “doors” that open to reveal a blank, unfolded area of the paper.
- Keeping the two flaps closed, take the top right corner and fold it toward the center where the two flaps meet, creating a right triangle. Repeat this process using the upper left corner. Sharply crease both of the folded edges you just created. Your paper now resembles a vertical rectangle topped by a triangle.
- Unfold the two right triangles. On the right side, open your “door”/flap to the point where the diagonal crease meets the folded edge. Press the folded edge above that point inward/to your left to reverse the fold. As you press inward, the paper should fold along the diagonal creases you made in step 4. (Hint: If your paper doesn’t fold easily, return to step 4 and more firmly crease the diagonal line. Then try step 5 again.)
- When the fold is properly reversed, the right triangle will be between the front flap and the paper behind it. The fold will be a valley fold that is parallel to the bottom edge of the paper.
- Repeat these steps to reverse the fold on the left side of your paper.
- Once both folds are reversed, your book will resemble an arrow pointed upward, with no diagonal creases visible.
Activity
Self and Symbols
- The outside of the book will have clues that reveal aspects of personality and/or identity. Ask students to consider: What do they want others to know about them? What symbols will they use to express these traits? Students will sketch one or more symbols that express something about themselves on the outside of their book.
- Next, students will create a self-portrait on the inside of the book. Ask students to begin by sketching the basic parts of the portrait: the body, pose, and gesture. Ask them to consider: What background will they choose (their bedroom or favorite place)? What will their choice say about them? What will the background say about them? How will they use color to affect the mood or influence how people understand the self-portrait? What facial expression will they use? What parts of the body and pose will they choose to include?
- Have students add details such as facial expression, clothing, background, and other objects to their self-portraits.
- Let each student choose a medium, such as crayon, marker, pen, or colored pencils, to complete the images in the book.
Reflect
When students have finished their self-portrait books, display them in the classroom. Discuss what each book tells about the person who made it. Ask a few students to explain what they did to express identity in their self-portraits and ask other students to make observations about their classmates’ work. Have students use sentence stems when talking about each other’s work, for example, “I notice….” or “I wonder….”
Go Deeper
Check out related writing objectives, lesson extensions, and more in the comprehensive PDF lesson plan.
Vocabulary
Portrait
Portrait is a picture or representation of a specific person. It can be rendered in any medium, such as pencil on paper, paint on canvas, sculpture, photograph, or collage.
Self-portrait
Self-portrait is a picture of the artist by the artist.
Subject
Subject is who or what the artwork is about. It can be a story, an idea, a person, an emotion, or a feeling. In a portrait or self-portrait, the subject is often referred to as the sitter.
Pose
Pose is the way the subject’s body is positioned in an artwork.
Identity
Identity is how a person sees or thinks of herself or himself. Identity can also refer to how people represent themselves to each other.
Foreground
Foreground is the part of the picture that seems closest to the viewer.
Background
Background is the part of the picture that seems farthest from the viewer.
Symbol
Symbol is an object or thing that has meaning more than the thing itself. A dog might represent fidelity in addition to being a pet; it is a visual sign for an idea or concept.
Elements of art
Elements of art are color, line, shape, form, space, value, and texture. Artists use these tools to create all visual art: representational, abstract, and non-representational. (Review the vocabulary list for definitions of individual elements of art.)
